Want to make this bag? I'll show you how. However, a warning: this is not for the faint-of-heart or beginner sewer. I am not very good at pattern-making (this was my first attempt), and I'm sure my instructions will not be detailed enough. Also, if you're an expert (or mildly proficient), please excuse my seams, I'm still learning.
This bag is made from pre-quilted material. The material is double-sided, so the bag and pockets have no inside liner. I found this to be a tricky problem, but I like what I ended up with.
You will need:
- 1 1/2 yd. pre-quilted (double-sided) fabric
- 12" Zipper
- 2 D-Rings
- Double-Fold Bias Tape
- Magnetic Closure/Toggle Button/etc. (optional)
- Large safety pin (not used in final product)
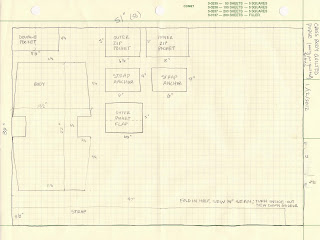
The following photo is my (rudimentary) pattern. All seams are 1/4". Click on the photo for a larger image.
Cut out all parts and label pockets with masking tape.
For the body and pockets:
If you're like me, pin a section of bias tape on the top edge (if you're like my mom, who's awesome, just align it and sew away!). Iron and sew all other edges (I found it easier to sew edges before pinning them on the body, because the fabric is so thick).
Sew inner zip* pocket on inside of bag, 2" down from the top and centered.
Sew outer zip* pocket on outside of bag, opposite of inner zip pocket, 2" from the top and centered. It should be the same width, but a little longer than the inner pocket.
Sew double pocket on the inside of the bag. Sew a line down the middle of the pocket to separate it into two pockets.
I hope you have a zipper foot. It will be handy for the next part. Sew the zipper on one side, then the other. If you don't have a zipper foot, like me, you can hand sew using a back stitch. Use sturdy thread (button) or double-ed up all purpose thread.
Turn the bag inside-out, right sides together, and sew the side seams and bottom.
Fold the corners so they make a box-shaped bottom and sew. Make sure to finish all seams (I did two rows of straight-stitching because that's all my machine could handle, it's nuts, but that's a different story).
That wasn't too bad, really. Just turn it inside-out and you're almost home-free!
Now for the strap:
Fold in half, right sides together, and sew edge.
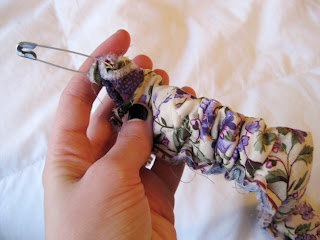
Now we're going to turn this puppy inside-out. The best way that I know starts with a large safety pin.

Pin the corner and then begin to push the pin inside the strap.
Keep pushing!
Once it's inside, begin to push it through the inside, pulling the fabric past it (getting rid of the bunchy-ness). This is the hardest part, be patient and don't let go of the safety pin!
Once it's through, it's a piece of cake. Just finish pulling the outer fabric over the inner fabric.
Sew bias tape on the raw edge. Fold the end 2" over the D-Ring and sew a box with an X in it (as shown). Finish each edge this way.
For the strap anchor:
Fold in half (6" edges together, hotdog style), right sides together, sew and turn inside-out (in the same way you just did the strap). Bias tape or just fold in and sew one edge to finish it (leave the other edge raw).
Fold raw edge through D-Ring to approximately 2" depth and sew to anchor.
Hand sew the anchors to the side of the bag, as shown below. At this point you can attach a flap over the outer pocket or call it quits.
For the flap:
Fold the 6 1/2" edge over 2". Fold in edges and trim excess if you want beveled edges, otherwise sew 1/4" seam on all edges and attach to bag. Attach magnetic closure as instructed on package, pushing through only one layer on the flap. Otherwise, use a cute button to close (or nothing at all).
You're finished!!!
I hope you like it! Let me know if you make one in the comments!


Lauren! I absolutely love that you made your own pattern! You are such a creative little engineer putting those skills to work.
ReplyDeleteI also love that you have black fingernail polish right now.
I also love your picture. You look so great always!
you never cease to amaze me Lauren!!! seriously wonderful!
ReplyDelete